
Tags: how to clean wood floors, wood floor cleaning, hardwood floor care, hardwood floor maintenance, cleaning wood floors, microfiber mop, wood floor cleaner, hardwood cleaning tips, engineered wood floors, floor care routine, clean hardwood floors, home cleaning tips
Wood floors have a warm, lived-in beauty that can make a home feel instantly more comfortable. But if you have ever seen cloudy streaks, water marks, dull patches, or tiny scratches after cleaning, you know why learning how to clean wood floors the right way matters.
The good news is that wood floor care is not complicated once you understand what the floor actually needs. Most damage comes from too much water, harsh cleaners, gritty dirt, steam, waxy residue, or cleaning habits that slowly wear down the finish. The National Wood Flooring Association notes that wood floor maintenance depends on use, wear, and lifestyle, and that dull floors can often be renewed through recoating when the finish allows it.
Think of your floor as a finished surface, not raw timber. In most modern homes, you are cleaning the protective finish on top of the wood. Protect that finish, and the floor stays beautiful for years. Attack it with wet mops, strong acids, or abrasive tools, and even expensive hardwood can start looking tired too soon.
Table of Contents
- Why wood floors need gentle cleaning
- How to clean wood floors safely
- Understanding your wood floor finish
- Daily and weekly wood floor cleaning routine
- Step-by-step: how to clean wood floors without streaks
- Best tools and cleaners for wood floors
- How to remove common stains and spills
- Cleaning engineered wood floors
- What not to use on wood floors
- Seasonal care and long-term protection
- FAQs
- Conclusion
Why wood floors need gentle cleaning
Wood floors look strong, but they are sensitive to moisture, grit, temperature changes, and chemical residue. The surface may feel hard under your feet, yet the finish can still become scratched, dulled, softened, or cloudy if cleaned the wrong way.
The biggest everyday enemy is grit. Tiny sand, dust, and dirt particles act like fine sandpaper when people walk across the room. Over time, that grit can wear down the finish, especially in entryways, kitchens, hallways, and under dining chairs. A report quoting flooring association guidance explains that sweeping or dust-mopping daily and vacuuming weekly with a hard-floor attachment helps reduce this abrasive buildup.
Water is the other major problem. A lightly damp mop is usually fine when used correctly, but a wet mop can push moisture into seams, cracks, and worn finish areas. That can lead to swelling, cupping, dark stains, or a dull surface. This is why many professional wood floor care guides repeat the same simple rule: clean with as little moisture as possible.
There is also a finish issue. Polyurethane, oil-finished wood, waxed floors, engineered hardwood, and older sealed floors do not all respond the same way. A cleaner that is safe for one floor may leave residue or cause damage on another. That is why the safest starting point is always the floor manufacturer’s care instructions if you have them.
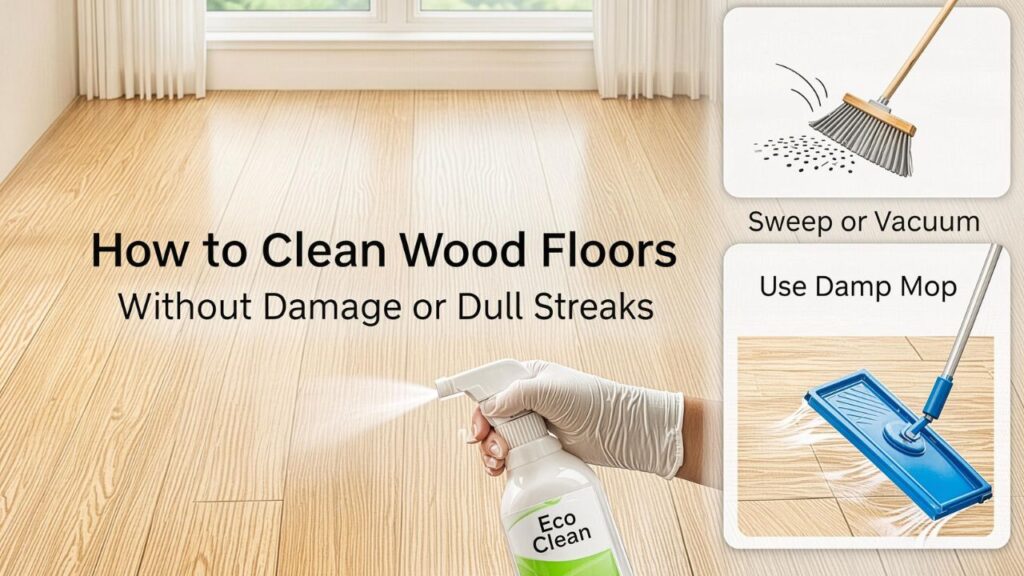
How to clean wood floors safely
The safest way to clean wood floors is to remove dry dirt first, then use a barely damp microfiber mop with a cleaner made for wood floors. Do not flood the surface. Do not leave puddles. Do not use steam unless your flooring manufacturer clearly says it is safe.
Bona’s homeowner cleaning guidance recommends using a microfiber mop and avoiding water-and-vinegar mixtures, soap-based cleaners, wax, and steam cleaners on hardwood floors because they can harm the finish or leave buildup.
That simple approach works because it respects the finish. Dry cleaning removes the grit. Damp cleaning lifts light soil. Quick drying prevents moisture trouble. You do not need a complicated routine or a cupboard full of strong products.
A simple definition of safe wood floor cleaning
Safe wood floor cleaning means removing dirt, dust, spills, and light residue without soaking the floor, scratching the finish, changing the sheen, or leaving sticky buildup behind.
That definition matters because “clean” should not mean “stripped.” A floor can look shiny right after using the wrong product, then become cloudy or slippery later. A good routine makes the floor look fresh without creating future problems.
Understanding your wood floor finish
Before choosing a cleaning method, try to understand what kind of floor you have. You do not need to become a flooring expert, but a little awareness can save you from expensive mistakes.
Surface-finished hardwood
Many modern hardwood floors are surface-finished with polyurethane or a similar protective coating. These floors usually handle a wood-safe cleaner and a damp microfiber mop well, as long as you avoid excess water.
They often have a smooth, sealed feel. If water beads on the surface for a short time instead of immediately soaking in, the floor is likely protected by a surface finish. Still, water should be wiped quickly.
Oil-finished wood floors
Oil-finished floors have a softer, more natural look. They may need specific soaps, refreshers, or maintenance oils recommended by the flooring manufacturer. Regular household cleaners can sometimes strip or dull the surface.
If your floor has a matte, raw-looking, European-style finish, check the product care guide before mopping.
Waxed wood floors
Older waxed floors need special care. Water-based cleaners can create white marks or haze. Waxed floors are usually maintained with products made for wax finishes, not standard polyurethane floor cleaners.
If you rub a white cloth with mineral spirits in a hidden spot and see waxy residue, the floor may be waxed. When unsure, ask a flooring professional before using any wet cleaning method.
Engineered wood floors
Engineered wood has a real wood veneer over a layered base. Many engineered floors are durable, but the top wood layer can be thinner than solid hardwood. That means aggressive sanding, heavy water, and harsh chemicals can be risky.
The cleaning method is usually similar to hardwood: dry dusting, soft vacuuming, and a barely damp microfiber mop with an approved cleaner.
Daily and weekly wood floor cleaning routine
A good routine is easier than a big rescue clean later. The goal is to stop dirt from building up, remove spills quickly, and keep the finish clear without over-washing.
Daily care
Daily cleaning does not mean deep cleaning. It means light attention in the areas that get used most.
Do these small tasks:
- Dust-mop busy areas with a microfiber pad
- Wipe spills as soon as they happen
- Shake out entry mats
- Pick up crumbs near dining areas
- Remove small stones or grit near doors
- Use a soft cloth under pet bowls if water splashes often
If you only have time for one thing, focus on grit near entrances. Dirt tracked from outside is one of the fastest ways to scratch a wood floor.
Weekly care
Once a week, vacuum or sweep more thoroughly. Use a vacuum with a hard-floor setting, soft brush attachment, or a floor head that does not scratch. Avoid spinning beater bars made for carpet because they can mark the finish.
After vacuuming, mop only if the floor needs it. Some weeks, dry cleaning is enough. Other weeks, especially in kitchens, dining rooms, and entryways, a damp clean may be helpful.
Monthly care
Every month, look closely at traffic paths. Are there cloudy areas near the kitchen sink? Sticky spots around the dining table? Scratches by the entry? Dull marks under chairs?
Small problems are easier to fix early. If you wait until the whole floor looks gray, tired, or uneven, you may need deeper maintenance or professional recoating.
Step-by-step: how to clean wood floors without streaks
Many people search for how to clean wood floors because they are tired of streaks. Streaks usually come from residue, dirty mop pads, too much cleaner, too much water, or mopping over dust.
Here is a simple method that works for most sealed wood floors.
Step 1: Clear the floor
Move small rugs, chairs, pet bowls, toys, and baskets. You do not need to empty the whole room, but give yourself enough space to clean in smooth passes.
Check under furniture edges. Dust hides under sofas, cabinets, and table legs.
Step 2: Remove dry dirt first
Use a microfiber dust mop, soft broom, or vacuum with a hard-floor attachment. This step is not optional. If you mop before removing dirt, you may smear grit across the finish and create fine scratches.
Work from the far side of the room toward the exit. Pay extra attention to corners, baseboards, and under cabinet toe kicks.
Step 3: Choose a wood-safe cleaner
Use a pH-neutral cleaner made for wood floors or the product recommended by your floor manufacturer. The EPA’s Safer Choice program can also help consumers identify cleaning products made with ingredients that are safer for human health and the environment.
Do not assume a cleaner is safe because it says “natural.” Lemon juice, vinegar, essential oils, or strong soap can still cause dullness, residue, or finish problems.
Step 4: Lightly dampen the mop
Your mop should be damp, not wet. If you can wring water from it easily, it is too wet. If it leaves puddles or visible water lines, stop and dry the floor.
A spray mop can help because it controls moisture. You can also spray cleaner lightly on the mop pad or directly in small sections, depending on the cleaner instructions.
Step 5: Mop in sections
Clean a small area at a time. Move with the grain of the wood when possible. Keep the mop flat on the floor and make smooth overlapping passes.
Bona’s cleaning guidance suggests keeping the microfiber mop on the floor while cleaning so dirt stays captured by the pad instead of being dropped back onto the surface.
Step 6: Change or rinse the pad
A dirty mop pad spreads soil. If the pad looks gray, sticky, or dusty, replace it with a clean one. In a large home, you may need more than one pad.
This small habit makes a big difference. Many streak problems are not caused by the cleaner. They are caused by trying to clean a whole floor with one dirty pad.
Step 7: Dry any damp areas
The floor should dry quickly. If you see wet patches after a few minutes, buff them with a dry microfiber cloth.
Do not close up a room with damp floors and poor airflow. Open a door, run a fan gently, or allow normal ventilation.
Best tools and cleaners for wood floors
The right tools protect the finish. The wrong tools can scratch, soak, or leave residue.
Best tools
Useful wood floor cleaning tools include:
- Microfiber dust mop
- Washable microfiber mop pads
- Soft-bristle broom
- Vacuum with hard-floor attachment
- Spray mop made for hard floors
- Dry microfiber cloths
- Felt pads for furniture
- Entry mats for inside and outside doors
A microfiber mop is popular because it traps dust and uses less liquid than a string mop. A string mop can hold too much water, which is risky for wood.
Best cleaners
The best cleaner depends on your floor finish, but most sealed wood floors do well with a pH-neutral, residue-free wood floor cleaner.
Look for:
- “Hardwood floor cleaner” on the label
- pH-neutral wording
- No wax unless your floor is waxed
- No oil soap unless manufacturer-approved
- No ammonia
- No bleach
- No steam requirement
- Clear dilution instructions if concentrated
If you are trying a new cleaner, test it in a hidden area first. Check after the floor dries. Look for dullness, stickiness, color change, or haze.
DIY cleaners: be careful
DIY cleaning recipes are popular online, but wood floors are not the best place for experiments. Vinegar is acidic. Lemon is acidic. Too much dish soap leaves residue. Essential oils can create slick spots.
Martha Stewart’s 2026 hardwood floor cleaning guidance warns against overly wet mops and harsh cleaners such as vinegar and lemon juice because they can damage wood floors.
How to remove common stains and spills
Spills are part of real life. Coffee drops, muddy shoes, pet accidents, cooking splatter, and water from a plant pot can all happen. The faster you respond, the better the result.
Water spills
Blot water immediately with a dry cloth. Do not rub harshly. If water sits on wood too long, it can leave marks or enter seams.
For pet bowls, plants, and entry areas, use mats that breathe and do not trap moisture underneath.
Food and drink spills
Wipe food and drink spills with a slightly damp cloth, then dry the area. Sticky spills may need a little wood floor cleaner on a cloth.
Avoid scrubbing with abrasive pads. A soft cloth and patience are safer.
Grease spots
Kitchen floors often collect tiny grease marks. Use a wood-safe cleaner and microfiber cloth. If the spot remains, repeat lightly instead of using a stronger chemical.
Scuff marks
Some scuffs come from shoes and furniture. Try buffing gently with a clean microfiber cloth. For stubborn marks, use the floor manufacturer’s recommended product.
Do not use magic eraser sponges without caution. They can be mildly abrasive and may dull the finish.
Pet accidents
Clean pet accidents quickly. Blot first, then use a wood-safe cleaner. If odor remains, use a cleaner approved for pets and hardwood. Avoid soaking the area.
Repeated pet accidents can damage finish and stain wood. In that case, a professional may need to evaluate the floor.
Cleaning engineered wood floors
People often ask whether engineered wood needs a different routine. In daily life, the safest routine is very similar: remove dry dirt first, use minimal moisture, and avoid harsh cleaners.
The difference is long-term repair. Solid hardwood can often be sanded more times than engineered wood. Engineered flooring has a real wood top layer, but that layer varies in thickness. Because of that, protecting the finish from scratches and water is especially important.
For engineered wood:
- Vacuum with a soft hard-floor attachment
- Use a microfiber mop
- Avoid soaking seams
- Clean spills quickly
- Follow the brand’s care guide
- Use rugs in high-traffic areas
- Avoid steam mops
- Do not use abrasive scrubbers
If the floor looks cloudy after cleaning, check whether your cleaner is leaving residue. Sometimes switching to a residue-free cleaner and washing mop pads separately from fabric softener can help.
What not to use on wood floors
Knowing what to avoid is just as helpful as knowing how to clean wood floors. Many common cleaning habits feel harmless, but they can slowly damage the finish.
Avoid steam mops
Steam forces heat and moisture into the floor. Even if the surface looks fine once or twice, repeated steam cleaning can weaken finish, open seams, or cause swelling in vulnerable areas.
Martha Stewart’s recent floor-care guidance describes a low-moisture approach as best for hardwood and similar delicate floor types and highlights a barely damp microfiber mop as a safer method.
Avoid vinegar and lemon juice
Vinegar and lemon juice are often promoted as natural cleaners, but they are acidic. Over time, acidity can dull or damage some wood floor finishes.
This is one of the most common cleaning myths. Natural does not always mean gentle for a finished wood surface.
Avoid oil soap unless approved
Oil soap can leave buildup on some finished floors. That buildup may attract dirt, create haze, or interfere with future recoating.
If your floor manufacturer recommends a specific oil soap, follow those instructions. Otherwise, choose a cleaner made for your finish type.
Avoid bleach and ammonia
Bleach and ammonia are too harsh for most wood floors. They can discolor, damage finishes, and create unsafe fumes if mixed with other cleaners.
Junckers, a wood flooring manufacturer, advises avoiding harsh chemicals such as bleach, ammonia, and sodium hypochlorite products on wood floors and recommends cleaners designed for wood.
Avoid soaking wet mops
A wet mop may feel satisfying, but wood floors do not need that much water. Too much moisture can soften the finish and create problems below the surface.
Avoid abrasive tools
Steel wool, rough scrub pads, stiff outdoor brooms, and gritty powders can scratch or dull the floor. Use soft tools instead.
Seasonal care and long-term protection
Wood responds to its environment. Humidity, temperature, sunlight, shoes, pets, and furniture all affect how the floor ages.
Protect entryways
Entryways collect the most grit. Use mats outside and inside each main door. Choose mats with breathable backing that will not stain the floor.
Shake or vacuum mats often. A dirty mat eventually becomes a dirt source instead of a dirt barrier.
Use rugs in busy areas
Rugs help in hallways, kitchens, dining spaces, and living rooms. Use rug pads that are labeled safe for wood floors.
Avoid rubber-backed mats that can trap moisture or discolor the finish unless the manufacturer says they are safe for your floor.
Add furniture pads
Chair legs, stools, sofas, and tables can scratch wood. Felt pads are cheap and very effective. Replace them when they flatten, collect grit, or fall off.
Dining chairs need special attention because they move constantly.
Watch sunlight
Strong sunlight can fade or change wood color over time. Curtains, blinds, UV-filtering window film, and rotating rugs can help keep color changes more even.
Maintain humidity
Wood expands and contracts with humidity. Very dry air can create gaps. Too much moisture can cause swelling. If your floor manufacturer gives a humidity range, try to stay within it.
Know when cleaning is not enough
Sometimes a floor does not need more cleaning. It needs recoating, screening, or refinishing. If the finish is worn through, cleaning will not bring back the shine.
Signs that cleaning may not be enough include:
- Gray traffic lanes
- Bare-looking wood
- Deep scratches
- Water stains that do not lift
- Finish peeling or flaking
- Dullness that returns immediately after cleaning
At that stage, ask a wood floor professional. More cleaner will not solve a worn finish.
A practical room-by-room cleaning plan
Every room uses wood floors differently. A kitchen does not need the same routine as a guest bedroom. A hallway does not wear like a formal dining room.
| Room or Area | Main Problem | Best Routine | Extra Protection |
|---|---|---|---|
| Entryway | Grit, mud, rainwater | Dust daily, wipe moisture fast | Indoor and outdoor mats |
| Kitchen | Crumbs, grease, spills | Vacuum often, damp mop as needed | Rug near sink and stove |
| Dining room | Chair scratches, food drops | Sweep after meals | Felt pads under chairs |
| Living room | Dust, pet hair, foot traffic | Dust mop several times weekly | Area rug under seating |
| Bedroom | Dust, light traffic | Weekly dusting or vacuuming | Soft rugs beside bed |
| Hallway | Heavy foot traffic | Dust often, damp clean when needed | Runner with safe rug pad |
| This kind of plan keeps cleaning realistic. You do not have to treat every room like a muddy entryway. Focus effort where the floor actually gets dirty. |
How to clean wood floors after construction or renovation
Renovation dust is different from normal dust. It is finer, heavier, and more abrasive. If you drag it around with a wet mop, it can create a cloudy mess.
Start with dry removal. Use a vacuum with a hard-floor attachment and a good filter if possible. Then dust mop. Repeat until the fine powder is mostly gone.
Only after dry dust is under control should you use a lightly damp microfiber mop. Change pads often. Construction dust can load a pad quickly.
If paint, adhesive, or plaster marks are present, do not scrape aggressively. Use the safest method recommended for your floor finish or call a professional. One careless scrape can leave a permanent mark.
How to clean wood floors naturally without damage
Many homeowners want a cleaner, safer home without strong chemical smells. That is understandable. The best natural-feeling approach is not necessarily a homemade acid mix. It is a low-moisture, low-residue routine.
Open windows when cleaning if weather allows. Use microfiber tools. Choose fragrance-free or low-scent cleaners made for hardwood. Check EPA Safer Choice listings if you want products reviewed against safer chemical criteria.
Also remember that less product often means a cleaner floor. Overusing even a safe cleaner can leave residue. Follow the label and resist the urge to add “a little extra.”
[Infographic: Wood floor cleaning routine showing daily dust mop, weekly vacuum, occasional damp mop, immediate spill cleanup, and products to avoid: steam, vinegar, bleach, ammonia, wet mop.]
How often should you mop wood floors?
You do not need to wet-clean wood floors every day. In fact, over-mopping can create dullness and moisture risk.
For most homes:
- Dust mop high-traffic areas daily or every few days
- Vacuum weekly with a hard-floor attachment
- Damp mop every one to four weeks, depending on use
- Spot clean spills immediately
- Deep clean only when the floor truly needs it
Homes with pets, children, outdoor shoes, or busy kitchens may need more frequent care. Quiet bedrooms may need much less.
The best test is visual and tactile. If the floor feels gritty, dry clean it. If it has sticky marks or cloudy soil, damp mop lightly. If it looks clean, leave it alone.
FAQs
What is the best way to learn how to clean wood floors at home?
The best way is to start with a simple routine: remove dry dirt with a microfiber dust mop or soft vacuum, then clean only when needed with a barely damp microfiber mop and a wood-safe cleaner. Avoid soaking the floor, and always dry spills quickly.
Can I use vinegar to clean wood floors?
It is better to avoid vinegar unless your floor manufacturer specifically approves it. Vinegar is acidic and can dull or damage some wood floor finishes over time. A pH-neutral wood floor cleaner is usually safer.
Is it safe to mop wood floors with water?
A lightly damp mop can be safe for many sealed wood floors, but a wet mop is risky. The mop should not leave puddles or water sitting on seams. If the floor does not dry quickly, you used too much moisture.
How often should I clean wood floors?
Dust or sweep busy areas daily or every few days, vacuum weekly, and damp mop only when needed. Kitchens, entryways, and hallways usually need more attention than bedrooms or formal rooms.
Can I use a steam mop on hardwood floors?
In most cases, no. Steam can push heat and moisture into seams and finish cracks. Unless your flooring manufacturer clearly says steam is safe for your exact floor, use a low-moisture microfiber method instead.
Why do my wood floors look cloudy after cleaning?
Cloudiness often comes from cleaner residue, too much product, dirty mop pads, hard water, wax buildup, or using the wrong cleaner for the finish. Try cleaning with a fresh microfiber pad and a residue-free wood floor cleaner.
What should I use for pet stains on wood floors?
Blot the mess quickly, then clean with a product labeled safe for both pets and wood floors. Avoid soaking the area. If the stain or odor has entered the wood, professional repair may be needed.
How do I clean old wood floors?
Old floors need extra caution. First, find out whether they are sealed, waxed, oiled, or worn through. Dry cleaning is safest at first. Avoid wet mopping until you know the finish can handle it.
Can I use dish soap on wood floors?
Dish soap can leave residue if used too often or in the wrong amount. It may also create a dull film. A cleaner made for wood floors is usually a better choice.
How do I clean wood floors without streaks?
Vacuum or dust first, use a clean microfiber pad, apply a small amount of wood-safe cleaner, mop in sections, and avoid excess moisture. If the pad gets dirty, change it before continuing.
Conclusion
Clean wood floors should feel smooth, warm, and quietly beautiful, not sticky, cloudy, or overworked. Once you understand how to clean wood floors with less moisture and gentler products, the whole process becomes much easier.
The best routine is simple: stop grit at the door, dry clean often, damp mop only when needed, wipe spills fast, and avoid harsh cleaners that damage the finish. With those habits, your wood floors can keep their natural charm through busy mornings, family dinners, muddy shoes, pets, guests, and all the ordinary moments that make a house feel like home.